
Requirements
- Cinema 4D Plugin - V3 license for the Cinema 4D plugin. If you do not own a V3 plugin you can purchase it on our purchasing page or upgrade your existing license.
- OctaneRender Standalone Edition - V3 license for the Standalone Edition. If you do not own a V3 Standalone Edition you can purchase it on our purchasing page or upgrade your existing license.
- Matching Version Numbers - License version numbers should be identical (e.g.V3.03.3 Standalone and V3.03.3 Cinema 4D plugin).
- Cinema 4D Host Application - Maxon Cinema 4D host application R13-R18 for Windows and R15-R18 for OS X. Please note that R16/R17 will need updates to 16.050/17.048 as a minimum in order to run the Cinema 4D plugin.
- Hardware - Nvidia graphics card that supports CUDA 7.5 with the latest drivers. You can find the download links for Windows and Linux here and the download links for Mac can be found here.
Installation
Step 1) Download and install the OctaneRender Standalone Edition. If you already have a Standalone license activated on your computer, you can skip this step.
***Please make sure that the Cinema 4D host application is not running in the background while you are installing the plugin.***
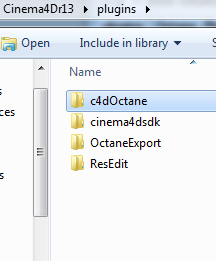
Step 2) Download the software from the Latest Additions to OctaneRender and extract the content of the archive and then add the content to the plugins folder in Cinema 4D file system.
Setting the plugin into Cinema 4D
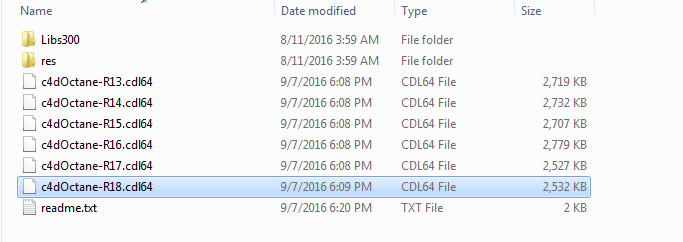
Step 3) The c4dOctane folder will come with several versions of the plugin in it. In order to avoid any loading issues, delete all of the c4dOctane-R(version number).cdl64files that you will not be using.
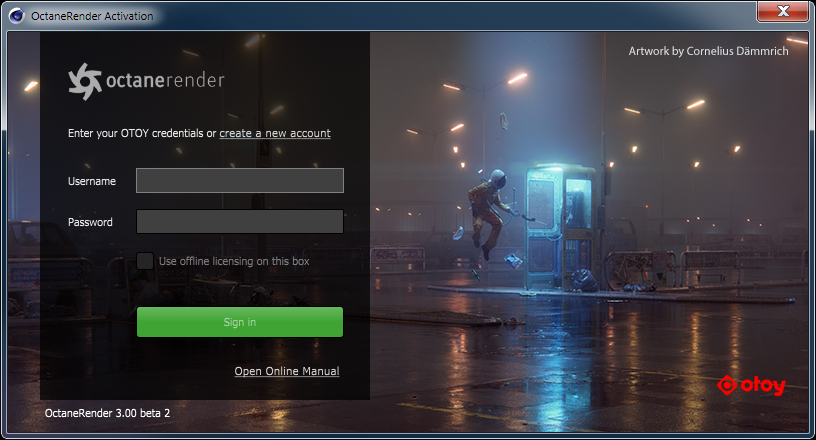
Step 4) Open the Cinema 4D application. If you did not activate your Standalone license, you will be prompted to enter your OTOY account username and password.
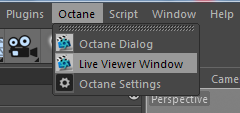
Once you have entered your credentials, you should see an Octane tab at the top of your application.
Now you should have successfully installed the OctaneRender for Cinema 4D plugin.
Troubleshooting
If you have followed the instructions above and do not see an Octane tab at the top of the Cinema 4D host application:
In cases where your installation of Cinema 4D is not using the default plugins path, it my not show up even after having installed it to the plugins folder. In this case you will need to install the plugin where Cinema 4D expects it, this will usually be the preferences folder.
Follow these steps:
- Locate the Cinema4D version’s preferences folder. You can note its location by going to Menu ->Edit -> Preferences, from the window invoked, there should be a button near the bottom left corner that says ‘Open Preference Folder’.
- Open the preferences folder and copy the path. The path may look similar to these:
- C:\Documents and Setting\<your username>\Application Data\MAXON\CINEMA4D R16\
- C:\Users\<your username>\AppData\Roaming\MAXON\CINEMA 4D R16_5B03E856
- or C:/Users//AppData/Roaming/MAXON/CINEMA 4D R16_/
- Run the installer and select the version of Cinema 4D
- Ensure to point the installer to your Cinema 4D’s Preferences folder by Pasting the path you copied in Step 2
- Wait until install process is completed.
Comments
0 comments
Please sign in to leave a comment.