
The Alembic Scene
OctaneRender can import rigid body animations from alembic files. To do this, either drag&drop the file into OctaneRender’s Graph Editor pane or create a Geometry -> Scene node in the Graph Editor to import an alembic file. If an alembic file is loaded directly, this will be the raw scene from the modelling application excluding the materials. Loading an alembic file will load the geometry’s animated vertices, animated transforms and also the camera paths. When an alembic file is loaded in the Graph Editor, the time slider becomes visible in the Render Viewport to allow a seamless loading of frames while scrolling through the animation.

The alembic file may also contain one or more camera paths. A camera path should be connected to the camera pin of the a RenderTarget node to make the octane camera move along this camera path. The scale of the scene can also be adjusted via a placement node in Octane Render. To enable camera motion blur, set the shutter time to a non-zero value, e.g. 0.0500
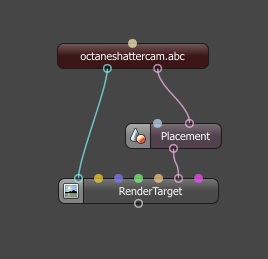
To modify materials used in the alembic scene, click on the alembic scene node on the Graph Editor to invoke the node’s parameters at Node Inspector Pane and click on the Edit Settings Icon specifically within these parameters.

Setting The Alembic Import Preferences
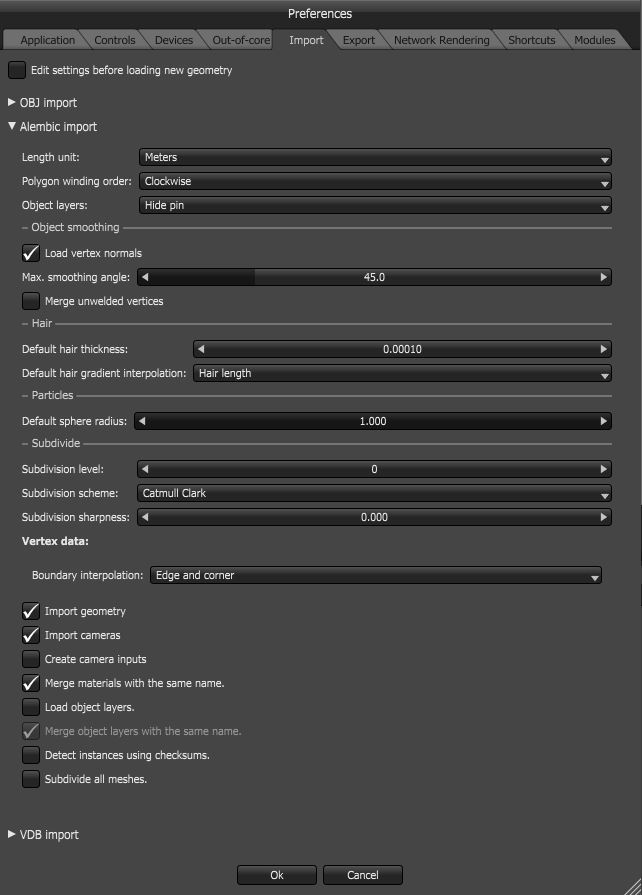
Length Unit — Tells OctaneRender the unit of measurement used in the geometry. The default unit is in meters.
Polygon Winding Order —Tells OctaneRender which way to control the polygon normal input in the mesh node and should be set in a way that the polygon normals align with the vertex normal. This alleviates problems which occur when the polygon normals are pointing in the opposite directs that the vertex normals (when face and vertex normal are not aligned) which happens mostly with specular materials and/or when applying displacement where the vertex/shading normals of displacement triangles are calculated during rendering using the polygon normals.
Object Layers — This controls how object layer pins are created on the mesh node to control the discrete objects.
Object Smoothing—Allows the user to set preferences related to geometry object smoothing including the option to load the vertex normals supplied by the geometry file.
Maximum Smoothing Angle — This sets the smoothing angle (degrees) for calculating Normals. Settting 0 will use the normals in the obj file and anything other than 0 will use that given smoothing angle set in Octane Standalone to be used to calculate normals for the imported meshes. In any case if Octane has to calculate vertex normals, set the maximum smoothing angle to 89, so it does n0t smooth straight angles.
Default Hair Thickness — This sets the value for the thickness of the polylines specific to hair primitives which are stored in mesh nodes to simulate Hair render features.
Subdivide — This allows subdivision surface refinement specifically based on Pixar’s OpenSubDiv implementation.
Use Adaptive Subdivision — This is an option to use OpenSubdiv in adaptive mode. Note that Octane can not render bicubic patches so it will render polygons instead. Tesselation will be finer around vertices which do not have exactly 4 neighbouring faces, and around semi-sharp edges.
Subdivision Level — This allows the user to control the number of times (levels) the original version of the mesh will be subdivided.
Subdivision Scheme — Users may select one of the OpenSubdiv subdivision scheme class which provides the methods for computing the various sets of weights used to compute new vertices resulting from subdivision.
- Catmull-Clark: A uniform refinement is applied to the faces of a mesh. It subdivides the mesh by the same amount.
- Catmull-Clark (smooth variant): OpenSubdiv Catmull-Clark with a smoothed preview version of the mesh.
- Loop: Subdivision scheme for triangular meshes where each recursively defined subdivision surface is divided into smaller ones.
- Bilinear: Subdivision scheme where the limit surface goes through the existing vertices resulting in only slightly softened edges but no drastic changes in shape.
Subdivision Sharpness — Controls the sharpness values for the crease at a vertex and around a vertex. Crease sharpness values range from 0 (smooth) to 10 (infinitely sharp).
Vertex Data
Boundary Interpolation — Specifies the rule that control how boundary edges and vertices are interpolated.
- None: No boundary edge interpolation should occur; instead boundary faces are tagged as holes so that the boundary edge-chain continues to support the adjacent interior faces but is not considered to be part of the refined surface
- Edge Only: All the boundary edge-chains are sharp creases; boundary vertices are not affected
- Edge and Corner: All the boundary edge-chains are sharp creases and boundary vertices with exactly one incident face are sharp corners
Face-Varying Data
Boundary Interpolation — Face-varying data is used when discontinuities are required in the data over the surface, the boundary interpolation specifies the rule that control how boundary edges and vertices are interpolated.
- None: Smooth everywhere the mesh is smooth
- Corners Only: Sharpen (linearly interpolate) corners only
- Edge and Corners: All the boundary edge-chains are sharp creases and boundary vertices with exactly one incident face are sharp corners
- Boundaries: Linear interpolation along all boundary edges and corners
- All: Linear interpolation everywhere (boundaries and interior)
Propagate Corners — Option to propagate corners in Edge and Corner mode.
Import geometry — Option to import the geometry from the Alembic file. This is on by default.
Import cameras — Option to load or not load camera objects from the Alembic file.
Create camera inputs — This option creates inputs for camera parameters which are not loaded from the Alembic file for the purpose of later camera adjustments in the UI.
Merge materials with same name — Alembic files may represent each application of the same material (or materials of the same name but of different meshes), this option will merge material representations that have the same name
Load object layers — Option to load the scene with object layers and create pins for the object layers.
Detect instances using checksums — Option to treat meshes in the Alembic files with the same checksums as instances. For old Alembic files whic don’t explicitly store instancing, it is advisable to switch this on.
Subdivide all mesh — This subdivides all meshes in a geometry archive, rather than the ones marked as subdivided.
Comments
0 comments
Please sign in to leave a comment.