
The Packager And The .ORBX File
OctaneRender allows the user to create packages containing macro nodes that store their most used materials, textures, and emission node setups for later use. This also allows users to store a scene as a package which automatically saves an .ocs file plus all used external files into one archive.
This feature replaces embedding images in .ocs files by packing the whole scene instead. Each package can then be stored locally or even uploaded to the OctaneLive Database as a shared resource for all users to access. This also enables the movement of the package across other applications, and to the cloud.
The Packager stores selected macro nodes into an .orbx archive. The macro can be an entire scene, a material or texture node setup, or simply a group of selected nodes.
The .orbx archive does not compress its contents and external applications can actually access any node straight from within the .orbx file.
Creating a Mesh Object Macro and Storing it as a Package
1) Add a Node Graph node
Right click on the Graph Editor and select Node Graph (fig. 4.42)
(Fig 4.42)
(Fig. 4.43)
2) Build the scene for the Mesh Object
Double click the Node Graph node to open up the new tab labeled Node Graph (fig. 4.43). Click on the new Tab to see “inside” the macro. This is where the constituent nodes of the macro can be added.

Input Nodes and Output Nodes can also be added to the macro. In (fig. 4.44). These will allow users to attach the node of their choice where it is applicable in the macro to be later on processed however the macro is defined. The macro in essence then acts as a “Black Box.”
(Fig 4.44)
So for the example above, the appropriate node is a Geometry Out node. Add any other material and textures to the scene until it is complete and connect the output of the mesh object to the Geometry Out node (fig. 4.45).
(Fig 4.45)
(Fig 4.46)
4) Save the macro node as a Package
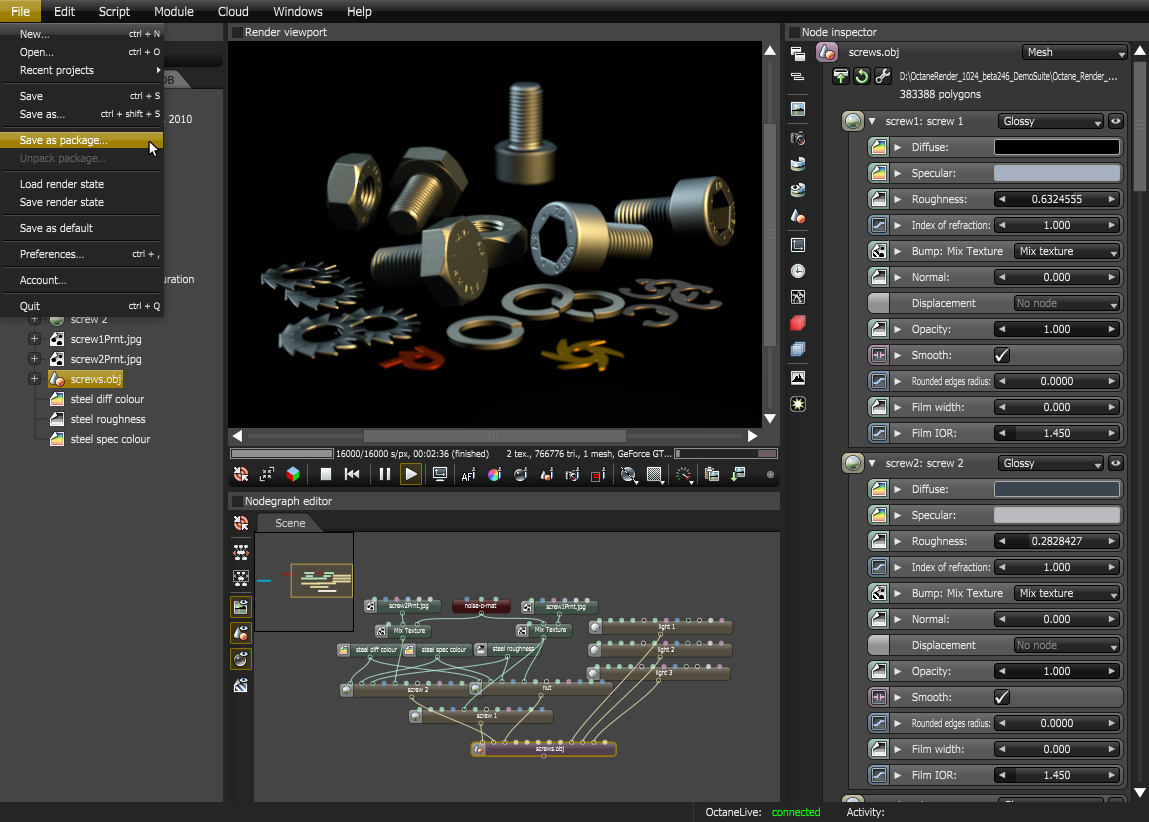
When the macro is completed, it can be saved for later use by clicking through File -> Save as Package.
(Fig 4.47)
IMPORTANT: All types of nodes, and groups of them can be saved to the hard disk as packages, including the connections between them. When used in a scene, a macro node is represented on the Node Inspector and users can choose to have the Node Inspector display the macro’s input constituent nodes or its output constituent nodes. Switching between viewing the output nodes or the input nodes of the macro is controlled by the Macro Display Mode button (Fig 4.47b).
 (Fig 4.47b)

Comments
0 comments
Please sign in to leave a comment.